


Upgrade Kit Rad Radpower
$229.00
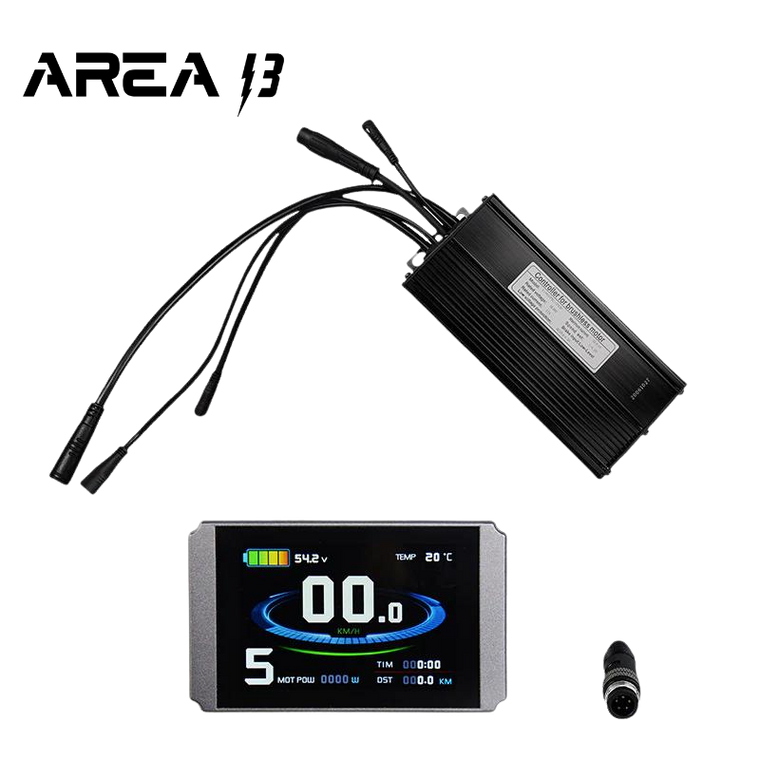
By far the most popular upgrade available, The Upgrade kit includes a new motor controller and new color display. The combination allows you to finally unleash the full potential of the stock motor and battery. This is THE upgrade kit your friends have been talking about.
35a controller and New Color LCD8H.
PLEASE READ FULL DISCRIPTION BEFORE ORDERING. CUSTOMER IS RESPONSIBLE FOR RETURN SHIPPING AND A 10% RESTOCKING FEE.
Plug and play for 2016-2018 Rover bikes. Please note that the controller has a tail light plug that will not be used. We do not recommend upgraded lights as it can burn up the headlight circuit.
Plug and play for 2019-2021 Rover models. (Up to Rover 5) (Not compatible with Rover 6) Will only work with stock 200 lumen headlight, will not work with the 500 Lumen headlights. THE 500 will burn up your controller.
Mini - Although also typically plug and play for 2018 and prior, this controller is substantially larger than stock and will not fit inside the frame or stock mounting locations. May have a different battery plug. Please check your bike and photos before ordering.
Older City or Wagon Models - Untested, but customers have reported it works well. Setting adjustments may be required. Controller may not fit correctly. Additional mounting hardware may be required. NOT compatible with new Radwagon 5.
Rover 6 + STEPOVER & STEP THROUGH- Does not work
Runner - Tested and working on prior models.
Rad 5Expand - works
Mission - Works, we recomend turning max power down.
Runner Two - Untested by Area 13, but customers have reported it is compatible.
Runner Plus - Tested and Working. NOT COMPATIBLE WITH 500 LUMEN STOCK HEADLIGHT.
Works with all European/Canadian models except Rover 6
Compatible with both 48v and 52 batteries. (NOT recommended for 60v)
Dimensions: 7.5" x 3.25" x 1.75"
How to Program:
The LCD screen has a handlebar mounted switch with three buttons, UP, DOWN, and a center Power button. 1. Start with battery and handlebar switch on. The LCD will be off.
2. Turn on LCD by pressing and holding POWER button. Holding the UP button will turn on the backlight if needed.
3. Within 5 seconds of turning LCD on, press and hold BOTH UP, and DOWN buttons for a few seconds to enter the settings mode.
Brief explanations are as follows.
P1 Motor Characteristic Parameter Setting Mode (100, 46 for direct drive motors on the Radcity or some Radwagon models)
P2 Wheel Speed Pulse Signal Setting Mode (5, 6 for upgraded 750w motors)
P3 Power Assist Control Mode (1)
P4 Handlebar Startup Mode (0)
P5 Power Monitoring Mode (15)
C1 Power Assist Sensor and Parameter Selection Mode (3)
C2 Motor Phase Classification Coding Mode (0)
C3 Power Assist Ratio Gear Initialization Mode (1)
C4 Handlebar Function Setting Mode (0)
C5 Controller Maximum Current Adjustment Mode (6)
C6 Backlight Brightness Adjustment Mode (3)
C7 Cruise Function Setting Mode (0 or 1. Setting to 1 enables cruise. While riding, hold the DOWN button to enable cruise control. Using the throttle or brakes will disable the cruise.
C8 Motor Operating Temperature Display Mode (0)
C9 Power-on Password Setting Mode (0)
C10 Automatic Restore Default Setting Mode (n)
C11 Attribute Selection Mode (0)
C12 Controller Minimum Voltage Adjustment Mode (4)
C13 ABS brakes of the controller and parameters of anti-charge control (0)
C14 Power-assist tuning parameters (1)
Press and hold POWER at any time to exit the setup mode.
Troubleshooting
* This is a universal kit. New controller may not fit in stock location and physical size may be different.
I cannot get my headlight to turn on:
Long press the UP arrow to turn the lights on and off.
Pedal assist is not working properly:
- If after adjusting the settings your pedal assist still does not work, check the following cables to ensure they are fully plugged in, check the pedal assist sensor connection. Make there is no bent or pins, and it is fully seated together:
- Pedal assist connector (yellow 3 pin coming from sensor)
- Motor Cable
- Main wiring harness (the one typically ran through the frame). Make sure there is NO bent pins
- If all the connections are good and no damage done to the pins or connectors, try changing the C1 setting to 2.
- If it still does not function, please check to make sure the motor works with throttle to eliminate a different type of problem. If throttle works but the pedal assist does not, the next step would be a different pedal assist sensor, or the stock motor controller and display. This should narrow down where the problem is occurring.
“Motor position sensor fault” or “Motor or controller short circuit fault!”:
In nearly all cases of receiving this error, the motor cable is not fully seated. Please note that the arrows can sometimes be up to 1/8th turn off. The cable should be firmly seated with the lines around the circumference of each half of the plug nearly flush. Wiggle back and forth on both cables and push firmly together.
I have a 48v battery, but it says 53v (or similar):
This is perfectly normal. A 48v battery when fully charged will be about 54 volts.
My battery voltage is over 48v, but the gauge reads empty:
Take the bike for a ride! Depending on settings it may be waiting for calibration. A few seconds of riding should fix this. If the problem persists, check the main harness connection coming from the controller through the frame and up to the handlebars. Check for any bent pins. A single bent pin will cause issues.
My speed does not read correctly, it jumps up to 49mph when coasting (and/or reads 0):
Please verify your P2 setting. An incorrect setting here will cause the wrong speed to be displayed when coasting. Also make sure you have the correct wheel dimension (DIM). The dimension is the overall tire diameter, not just the rim size. P2 = 5 for stock motor. P2 = 6 for upgraded Bafang 750W motor.
RadCity and RadWagon (direct drive motor):
Note that some settings may need to be changed for proper operation. P1 is determined by the number of magnets or poles in the motor as well as the gear reduction. As the RadCity and older RadWagon have a direct drive motor, use the setting 46 for P1. P2 may also require a change for a correct speed reading.
Motor or system shuts down while riding:
Adjust your C5 setting to a lower current output. Settings 0-2 are different take off speeds followed by max power. 3 is the lowest current output and 10 is the highest. Take the bike for a spin and adjust the current output till you find a happy medium the controller and motor are happy with. For stock motors, we recommend 5 - 7 for C5.
CHECK OUT THIS YOUTUBE VIDEO FOR STEP BY STEP SET UP. https://www.youtube.com/watch?v=B0F6x8V0NZQ
*The Upgrade Kit is created for specific models of Rad bikes, and that name is used for part compatibility or identification only. We are not affiliated with that company and this item is an aftermarket part.
Related Products
-

-
-
-
Radpower LCD8H Display
$89.99


Reviews
-
Must Have Upgrade!
Finally after many months of waiting I got my Boton Radrover Controller & Color Display Upgrade! Toughest part is getting to those bottom nuts and bolts on the Controller metal straps. **Hint buy a 7mm wrench to hold onto the back nut while screwing in the bolt. I had one error message when I tried to ride it but found out I didn't have the motor cable plugged in all the way. I put in the programming values into the display using Bolton suggested values and some I found from Radrover Facebook Guru's and off I went like a flash. Its like buying a faster torqued up Bike that now eats up hills!! I'm 6'5 and over 200lbs so this is a must have. Thank you Kyle!!
-
Must Have!
Going to echo the previous 2 reviews. This upgrade is awesome! Took less than 30 minutes to install and set up. The toughest parts were pulling out the frame grommet to get better access and relief for the plug and tightening the bottom bolts as the previous review states. 2021 RadRover 5, I am 6'3" 240 and this completely changed how the bike takes major hills now. I turned my C14 down from 2 to 1. C14 on 2 was giving me almost 200 watts on assist1 and was more than I needed. I set C14 to 1 and now getting about 75 watts on assist1 which is perfect. Here are my settings: P1: 100 P2: 5 P3: 1 P4: 0 C4: 3 - *This was the only combo that gave me full throttle with pedal-assist on 0 gear C5: 2 = 1 power step up then max, 1 = 2 power step ups then max, 0 = 3 power step ups then max, 3-10 = 3 max*.5, 10 max C14: 1 for weaker pedal-assist watts all gears, 2 for default pedal-assist watts all gears, 3 for strongest pedal-assist watts all gears
-
Radrunner EU Version: Very simple to fit even for someone with no skills like me
Everyone should get this, it really is plug and play, and it really makes a huge difference. The fitting is fairly simple, the only difficulty I had was getting the controller secure between the protection plate and the frame of the bike. Havi g said that it was still only a 45 minute job and compared to having fitted the mudguards to it this was a breeze. The mudguards really should be fitted on it from the factory but that's a different story. The Radrunner feels very underpowered climbing hills, and from reading other comments I guess this is same for both US and EU versions but this upgrade is so good. Put a massive smile on my face as I used the throttle and rather than it just being able to start the wheels turning, it actually accelerates. The one downside was a massive £49 customs bill to import it into the UK which makes this very expensive. I'd love to get more stuff from Bolton e-Bikes but the customs duty into the UK makes it very expensive, will have to look closer to home for the next upgrades.
-
Unbelievable
I really dont ever write any reviews but I am so happy about this Radrover upgrade kit. OMG! My 2020 Radrover went from being "ok" to a freaking monster. I love the torque of this kit. 35a controller with the "true" 750watt motor. I recommend this to anyone that is hesitant to order. 5 stars!!
-
Perfect !
Absolutely perfect ! Thx for eveything
-
Excellent customer service
I ordered 2 of the upgrade controller with display for RAD. After 1 month I had a situation where both bikes shut down within a day of each other. Mark shipped out 2 replacement controllers. Once the controllers arrive I still could not turn the bikes back on. Mark immediately sent out 2 replacement displays. Turned out the original controllers were good and the displays went bad. Cannot say enough about the responsiveness to get me back up and running. Thanks guys!
-
Just got mine running - Awesome Opossum Hill Climbing is way Better
This is day one. The Rad Rover upgrade kit. Alone no motor upgrade yet. Bike speed is topping out at 28 now on flat ground. The main improvement is at least hitting 10mph up Seattle's hills now, before I topped out at 5 with pedal assist. Now even without pedaling I can get up hills much faster. I'm 255 lbs. So your hillclimbs might be faster. The hardest part of the kit was the connection in the frame. OMG that sucked. Take the gromet out first. And pull any easy to get cords out first. Tip of the day! That last plug is a pain. So far, the bike is working great. I'll update after a few weeks. And I might order that new motor too. As I said, I'm 255 lbs. Also waiting for that 2nd battery splicer to be back in stock. Bolton you all rock!
-
Much better hill climbing ability with the upgrade!!
Just got the kits for our Rover 5's - I have to say WOW! Amazing difference for hill climbing. Prior to the upgrade, I could go up our hill at best 6MPH with just the throttle, now it's 10 to 12 MHP. Lots more torque! My wife loves the extra power. Yeah, it eats up a bit more battery life, but way worth it. Time will tell if we need the motor upgrade. Waiting for the hydraulic brakes to get in stock now. Thanks, Kyle for putting these together!
-
Outstanding
Hey got my upgrade kit for my radrunner just saying thank you it's a world of difference keep up the good work appreciate the quality product have a great day