


Upgrade Kit Rad Radpower
$229.00
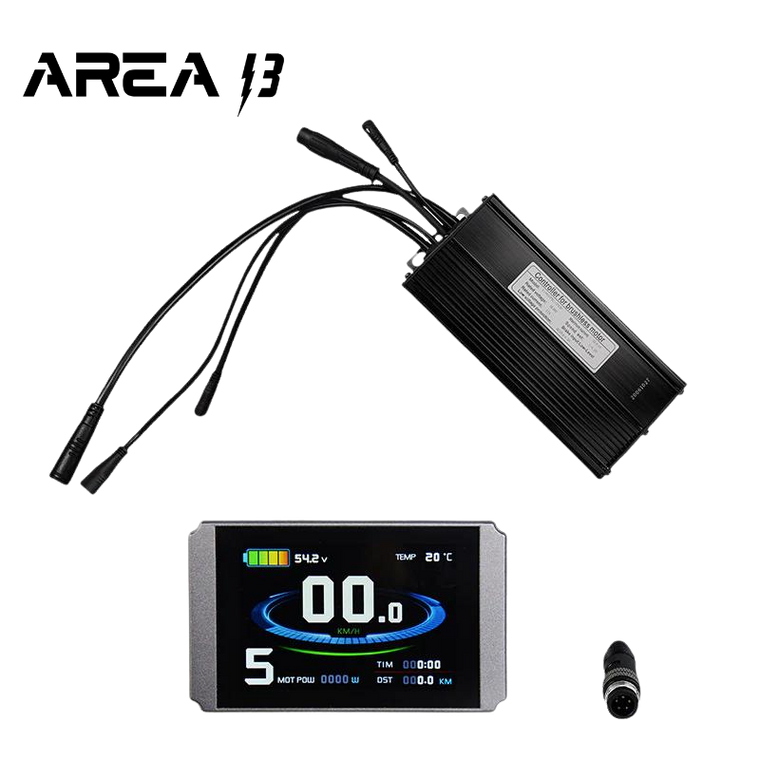
By far the most popular upgrade available, The Upgrade kit includes a new motor controller and new color display. The combination allows you to finally unleash the full potential of the stock motor and battery. This is THE upgrade kit your friends have been talking about.
35a controller and New Color LCD8H.
PLEASE READ FULL DISCRIPTION BEFORE ORDERING. CUSTOMER IS RESPONSIBLE FOR RETURN SHIPPING AND A 10% RESTOCKING FEE.
Plug and play for 2016-2018 Rover bikes. Please note that the controller has a tail light plug that will not be used. We do not recommend upgraded lights as it can burn up the headlight circuit.
Plug and play for 2019-2021 Rover models. (Up to Rover 5) (Not compatible with Rover 6) Will only work with stock 200 lumen headlight, will not work with the 500 Lumen headlights. THE 500 will burn up your controller.
Mini - Although also typically plug and play for 2018 and prior, this controller is substantially larger than stock and will not fit inside the frame or stock mounting locations. May have a different battery plug. Please check your bike and photos before ordering.
Older City or Wagon Models - Untested, but customers have reported it works well. Setting adjustments may be required. Controller may not fit correctly. Additional mounting hardware may be required. NOT compatible with new Radwagon 5.
Rover 6 + STEPOVER & STEP THROUGH- Does not work
Runner - Tested and working on prior models.
Rad 5Expand - works
Mission - Works, we recomend turning max power down.
Runner Two - Untested by Area 13, but customers have reported it is compatible.
Runner Plus - Tested and Working. NOT COMPATIBLE WITH 500 LUMEN STOCK HEADLIGHT.
Works with all European/Canadian models except Rover 6
Compatible with both 48v and 52 batteries. (NOT recommended for 60v)
Dimensions: 7.5" x 3.25" x 1.75"
How to Program:
The LCD screen has a handlebar mounted switch with three buttons, UP, DOWN, and a center Power button. 1. Start with battery and handlebar switch on. The LCD will be off.
2. Turn on LCD by pressing and holding POWER button. Holding the UP button will turn on the backlight if needed.
3. Within 5 seconds of turning LCD on, press and hold BOTH UP, and DOWN buttons for a few seconds to enter the settings mode.
Brief explanations are as follows.
P1 Motor Characteristic Parameter Setting Mode (100, 46 for direct drive motors on the Radcity or some Radwagon models)
P2 Wheel Speed Pulse Signal Setting Mode (5, 6 for upgraded 750w motors)
P3 Power Assist Control Mode (1)
P4 Handlebar Startup Mode (0)
P5 Power Monitoring Mode (15)
C1 Power Assist Sensor and Parameter Selection Mode (3)
C2 Motor Phase Classification Coding Mode (0)
C3 Power Assist Ratio Gear Initialization Mode (1)
C4 Handlebar Function Setting Mode (0)
C5 Controller Maximum Current Adjustment Mode (6)
C6 Backlight Brightness Adjustment Mode (3)
C7 Cruise Function Setting Mode (0 or 1. Setting to 1 enables cruise. While riding, hold the DOWN button to enable cruise control. Using the throttle or brakes will disable the cruise.
C8 Motor Operating Temperature Display Mode (0)
C9 Power-on Password Setting Mode (0)
C10 Automatic Restore Default Setting Mode (n)
C11 Attribute Selection Mode (0)
C12 Controller Minimum Voltage Adjustment Mode (4)
C13 ABS brakes of the controller and parameters of anti-charge control (0)
C14 Power-assist tuning parameters (1)
Press and hold POWER at any time to exit the setup mode.
Troubleshooting
* This is a universal kit. New controller may not fit in stock location and physical size may be different.
I cannot get my headlight to turn on:
Long press the UP arrow to turn the lights on and off.
Pedal assist is not working properly:
- If after adjusting the settings your pedal assist still does not work, check the following cables to ensure they are fully plugged in, check the pedal assist sensor connection. Make there is no bent or pins, and it is fully seated together:
- Pedal assist connector (yellow 3 pin coming from sensor)
- Motor Cable
- Main wiring harness (the one typically ran through the frame). Make sure there is NO bent pins
- If all the connections are good and no damage done to the pins or connectors, try changing the C1 setting to 2.
- If it still does not function, please check to make sure the motor works with throttle to eliminate a different type of problem. If throttle works but the pedal assist does not, the next step would be a different pedal assist sensor, or the stock motor controller and display. This should narrow down where the problem is occurring.
“Motor position sensor fault” or “Motor or controller short circuit fault!”:
In nearly all cases of receiving this error, the motor cable is not fully seated. Please note that the arrows can sometimes be up to 1/8th turn off. The cable should be firmly seated with the lines around the circumference of each half of the plug nearly flush. Wiggle back and forth on both cables and push firmly together.
I have a 48v battery, but it says 53v (or similar):
This is perfectly normal. A 48v battery when fully charged will be about 54 volts.
My battery voltage is over 48v, but the gauge reads empty:
Take the bike for a ride! Depending on settings it may be waiting for calibration. A few seconds of riding should fix this. If the problem persists, check the main harness connection coming from the controller through the frame and up to the handlebars. Check for any bent pins. A single bent pin will cause issues.
My speed does not read correctly, it jumps up to 49mph when coasting (and/or reads 0):
Please verify your P2 setting. An incorrect setting here will cause the wrong speed to be displayed when coasting. Also make sure you have the correct wheel dimension (DIM). The dimension is the overall tire diameter, not just the rim size. P2 = 5 for stock motor. P2 = 6 for upgraded Bafang 750W motor.
RadCity and RadWagon (direct drive motor):
Note that some settings may need to be changed for proper operation. P1 is determined by the number of magnets or poles in the motor as well as the gear reduction. As the RadCity and older RadWagon have a direct drive motor, use the setting 46 for P1. P2 may also require a change for a correct speed reading.
Motor or system shuts down while riding:
Adjust your C5 setting to a lower current output. Settings 0-2 are different take off speeds followed by max power. 3 is the lowest current output and 10 is the highest. Take the bike for a spin and adjust the current output till you find a happy medium the controller and motor are happy with. For stock motors, we recommend 5 - 7 for C5.
CHECK OUT THIS YOUTUBE VIDEO FOR STEP BY STEP SET UP. https://www.youtube.com/watch?v=B0F6x8V0NZQ
*The Upgrade Kit is created for specific models of Rad bikes, and that name is used for part compatibility or identification only. We are not affiliated with that company and this item is an aftermarket part.
Related Products
-

-
-
-
Radpower LCD8H Display
$89.99


Reviews
-
Excellent upgrade
Hi , team Bolton Bike this is a must for an upgrade , it does unlock the fun factor of the bike , works excellent have 1800 Kms on it in 3 months. Thanks Kyle and team.
-
Delivers the torque for hiills
Just received and installed my Bolton controller/console upgrade on my 2017 Radcity. Kudos to those able to install in an hour or less. Doubled my estimate and took even longer due to the tight quarters and some stupidity (already factored in). There were, fortunately, no surprises once the installation was complete. I already knew the larger size would be compressing the rear mudguard slightly and I think I hear a slight hiss, but the ride isn't affected. Replacing the lower grommet was a bit of a chore, so be forewarned. Also, as others have noted, could not install the lower controller mounting bracket and resorted to zip ties. After only one ride, it held up well but time will tell. As for performance, it has lived up to expectations as other reviewers have noted. I was looking for more torque for hills, and it delivers. It's a new bike. I was not looking to increase top speed and did not replace the stock direct drive motor. Not sure what the toll will be on the motor over time. I'm expecting some loss in distance with the higher amps delivered. With the current settings recommended by another reviewer with a newer Radcity, I'm finding a bit more assistance at lower motor gear levels than I need and will be playing more with some of the settings. I highly recommend this upgrade for those needing more torque for hill-climbing.
-
Best upgrade ever
I read all the reviews here before ordering and they are spot on. Took 45 minutes total. It is extremely helpful to have the bike on a stand to do this swap. Otherwise, most of the work is 6” off the ground. I was grateful for some of the tips here about the connector in the frame, definitely saved me some time. Everything I needed to install for my Radrover was in the box. Wow, it is so much quicker off the line. You physically get a shove back when you accelerate. Top speed is maybe 2mph faster at 26mph, but it gets there in a hurry. I live on a very flat island and don’t have hills, but I love the acceleration. Next stop - 750 motor upgrade when they are back in stock. I did the hydraulic brake caliper upgrade and I don’t know that it was worth it. I will eventually swap to full hydraulic brakes. I really should have bought a Bolton bike with all this stuff on it in the first place. Kevin
-
Controller Upgrade RadRove5
I just installed the new controller from Bolton on my RadRover5 and I'm happy with the changes. It has increased the torque on take off and on hills with the recommended settings. Things to watch out for are the mounting nuts need to have washers or the nuts will distorts the mounting holes and make sure to remove rubber grommet under bike to reach the connector for the controller which is inside the frame. The wire connector for battery is too long, stock is 4" and tucks into frame, upgraded is 6" and hangs down under bike. I look forward to the 750 watt motors to be in stock again which is my next upgrade.
-
Highly Recommended
This turned my disappointingly slow Rad Rover 5 into a rocket. It used to max out at 30km/h with slow acceleration. Now I pretty much have an electric dirt bike. It's winter and extremely cold right now, but I still hit 49 km/hr easily today on a speed test. Everything was plug-and-play with the new controller. It plugs into the original RadRover5 connectors. No splicing required. I had it installed in under and hour. The new display is beautiful, I am already getting compliments on it. Get the Bafang750watt motor and a 52V battery as well if you want top performance. Thanks Bolton Ebikes
-
Rad Upgrade Kit is Stellar
I upgraded controller/display, motor, brakes and third party 52v battery. After several thousand km's of riding the upgraded RAD I have one (and only one) complaint: The jump from PAS 4 to PAS 5 is over 600 watts. (Perhaps this can be fixed with settings.) Living in a very hilly area, the extra power is crucial for the "big ones" and my new routes are mainly out in the boondocks up and down innumerable hills. Pedalling hard in 7th gear I use the PAS to adjust for the terrain. The Bolton kit turned the Radrover into a billy goat; capable of climbing any hill I found in the two-county area. I have a 24 ah battery but I just can't seem to turn around until I get close to half charge so my rides have stretched to 50-60 miles. Thanks to Bolton for putting this kit together; pure genius!
-
5 Stars for Area 13!
Glad I decided to go thru Area 13 to get my new controller for my 21 RadRunner Plus, which I just received, today! It's on pre-order for February so, when I noticed it had already shipped, I was shocked, life I'd seen an alien!
-
Perfect upgrade
This controller woke up a sleeping beast. So much snappier. The only downside is now I want to get a motor upgrade as well. Easy to install and program.
-
Awesome!!
Transforms any Rad Rover (Accept 6) into a total monster! VAST IMPROVEMENT!!