


Blackbird Controller
$89.99


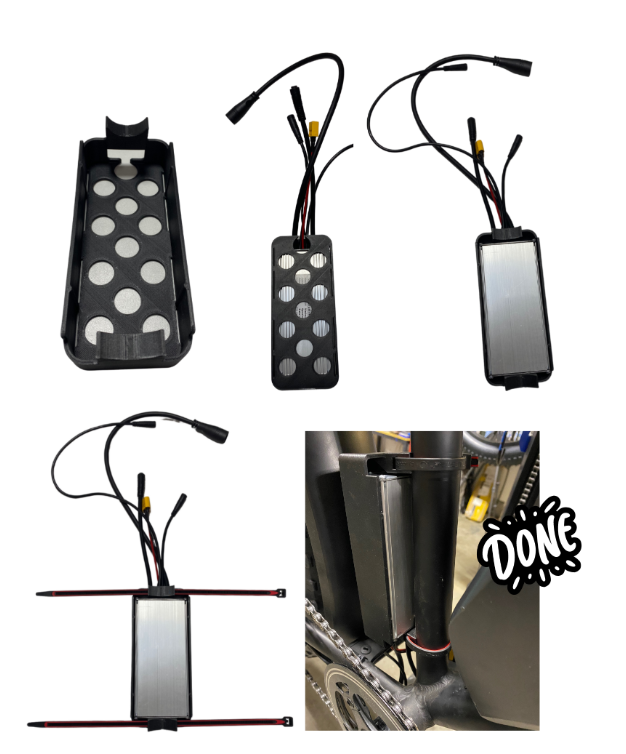
Updated controller box for the Area 13 Blackbird. This box is Made in the USA and open for airflow for maximum performance.
Follow the steps below to remove the original Blackbird controller box and install the new controller enclosure.
The controller is mounted inside a black box on the seat tube. There are 4 small bolts holding the back of the controller box in place. It may be easiest to access these if the battery is also removed.
Remove the back of the controller box and slide the controller out. It is a snug fit with the fender, but it will come off.
Unplug all connections to the controller. They are either color coded or a specific style and cannot be mixed up when reinstalling.
You may have to cut a few zip ties holding cables to the frame.
With the controller off, remove the front half of the controller box from the frame. There are 2 bolts holding it on.
Set aside the bolts and the original controller box. They will not be reused.
Slide the controller into the new case. The wires will slide through the opening on the bottom end. The large hole in the bottom is used for the motor cable to fit through.
With the controller fitted inside the enclosure, reinstall it onto the downtube using the two rubber GripLock ties. These will ensure the controller cannot move side to side.
The GripLock ties have a small tab that makes them removable and reusable if needed. The excess length can be trimmed off after installation.
With the controller firmly mounted on the frame, reconnect all cables.
Pay close attention to the pins on smaller connectors to ensure they are properly lined up before pushing the connectors together.
Use zip ties to clean up any loose cables.
Make sure all wiring is secured so that it cannot catch on the chain, cranks, or other moving components, and make sure no cables are hanging below the bike.



I received my package on time with no issues. I could have used a short video of installing the control box on my Blackbird.
Not entirely sold on this..I use my blackbird for a lot of off road, trail biking and the original seems to have better protection. I traced the hole pattern from the new box onto the old one and drilled holes to allow it to breathe better. If my controller still overheats, then I’ll change boxes.
The newer controller box for the Blackbird makes it much easier to access the controller and looks like it will keep the controller much cooler with it's large vent holes. It also has a much smaller profile making it look sleeker and less bulky.
The new cover looks really cool, and the instructions included are easy to follow and it is a simple installation. But be careful as usual unplugging and bending wires after the installation my brake icon was on the display and I couldn’t get any power to pedal or throttle. Still working with Kyle on how to diagnose the problem and repair it.
I haven’t had a chance to install it yet. But it looks like it will do the job for keeping a controller a lot cooler. Which should do wonders for its longevity.
Good service but the controller was not the problem cost me $120 + problem was the torque sensor Area13 shipped me a new sensor no charge great service thanks to all at Area 13